Create an Ethereum Web3 wallet in Android
In this guide, we'll talk about how we can use Web3Auth to build your Ethereum Web3 wallet in Android. The wallet will only support the Ethereum ecosystem, but functionality can be extended with any blockchain ecosystem.
Check out Embedded Wallets management infrastructure for a high-level overview of the Embedded Wallets management infrastructure, architecture, and implementation. For those who want to skip straight to the code, find it on GitHub.
:::
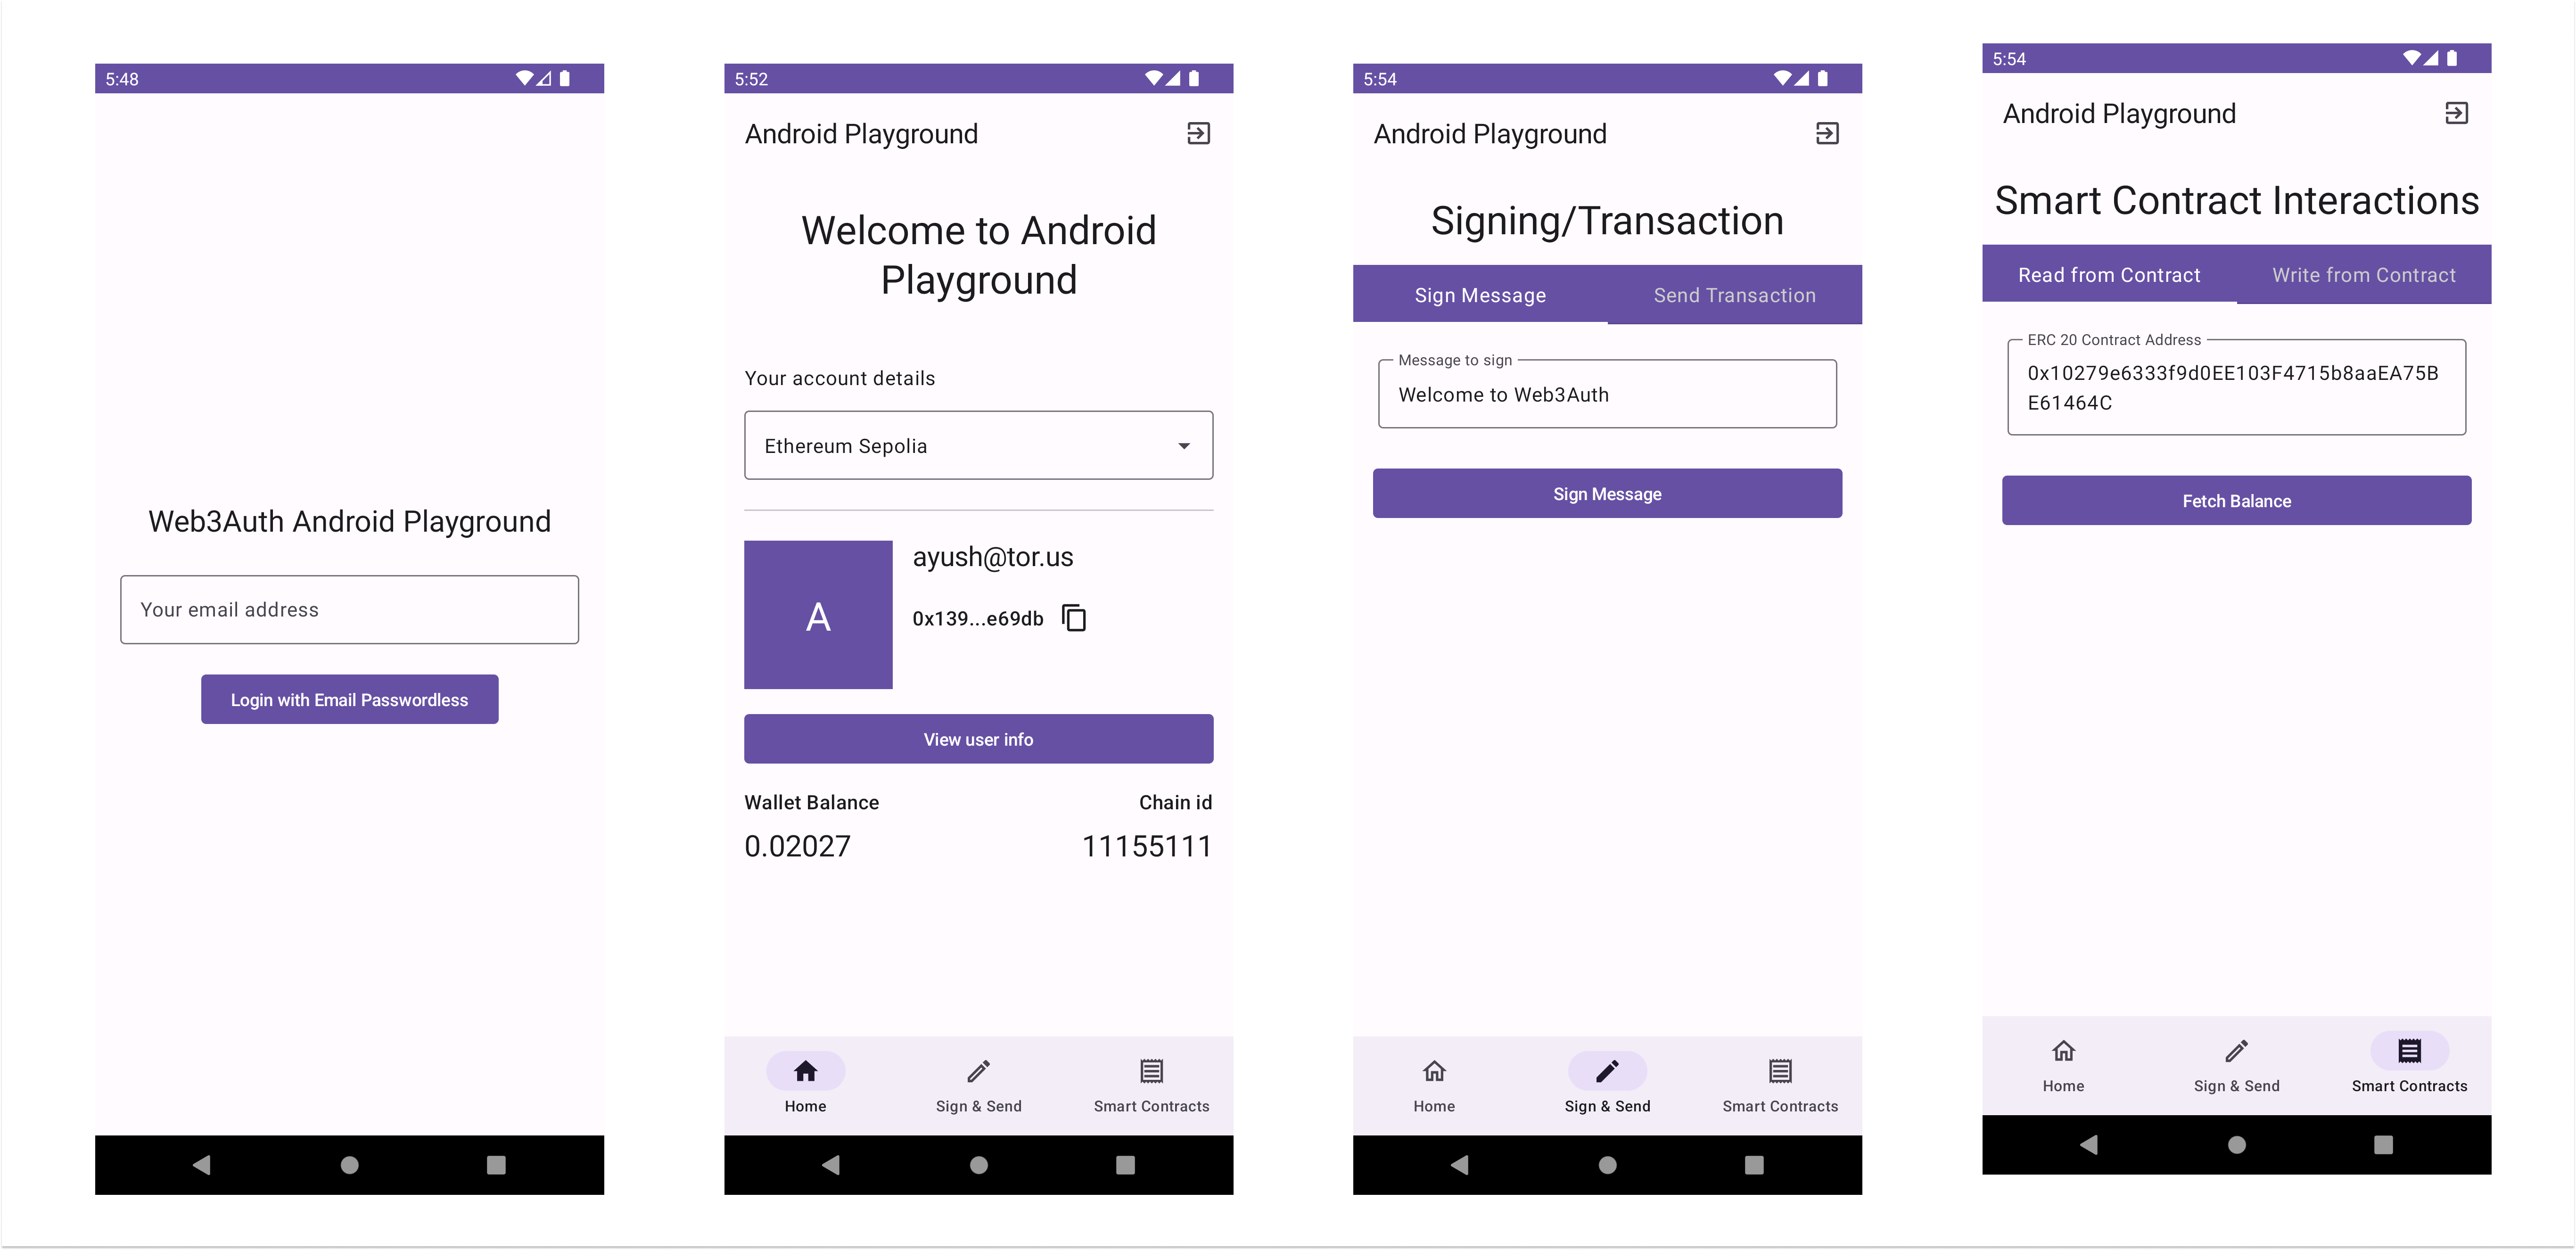
This is what your application will look like:
Step 1: Set up the Embedded Wallets dashboard
If you haven't already, sign up on the Embedded Wallets platform. It's free and gives you access to the Embedded Wallets' base plan. After the basic setup, explore other features and functionalities offered by Embedded Wallets. It includes custom verifiers, whitelabeling, analytics, and more. Head to the Embedded Wallet documentation page for detailed instructions on setting up the dashboard.
Step 2: Integrate Embedded Wallets in Android
Next, integrate the Embedded Wallets/Web3Auth SDK in your Android application. For the implementation, we'll use the "web3auth-android-sdk" SDK to manage an Embedded Wallet in your Android application.
2.1 Installation
To install the web3auth-android-sdk SDK:
2.1.1 In your module-level build.gradle or settings.gradle file, add the JitPack repository.
dependencyResolutionManagement {
    repositoriesMode.set(RepositoriesMode.FAIL_ON_PROJECT_REPOS)
    repositories {
        google()
        mavenCentral()
        maven { url "https://jitpack.io" } // <-- Add this line
    }
}
2.1.2 In your app-level build.gradle dependencies section, add the web3auth-android-sdk.
dependencies {
    // ...
    implementation 'com.github.web3auth:web3auth-android-sdk:7.4.0'
}
2.2 Initialization
2.2.1 Next, initialize Web3Auth in your Android app. This sets up the necessary configurations using Client ID and prepares Web3Auth.
Since we are using the Model–View–ViewModel (MVVM) architecture for the wallet, along with dependency injection,
we have defined a Web3AuthHelper to interact with a Web3Auth instance, which also makes it easier to write
mocks for unit testing.
class Web3AuthHelperImpl(
    private val web3Auth: Web3Auth
): Web3AuthHelper {

    // Performs the login to authenticate the user with Web3Auth network.
    override suspend fun login(loginParams: LoginParams): CompletableFuture<Web3AuthResponse> {
        return web3Auth.login(loginParams)
    }

    // Logout of the current active session.
    override suspend fun logOut(): CompletableFuture<Void> {
        return web3Auth.logout()
    }

    // Returns the Ethereum compatible private key.
    override fun getPrivateKey(): String {
      return web3Auth.getPrivkey()
    }

    // Returns the user information such as name, email, profile image, and etc.
    // For more details, please checkout UserInfo.
    override fun getUserInfo(): UserInfo {
        try {
            return web3Auth.getUserInfo()!!
        } catch (e: Exception) {
            throw e
        }
    }

    override suspend fun initialize(): CompletableFuture<Void> {
        return web3Auth.initialize()
    }

    override suspend fun setResultUrl(uri: Uri?) {
        return web3Auth.setResultUrl(uri)
    }

    override suspend fun isUserAuthenticated(): Boolean {
        return web3Auth.getPrivkey().isNotEmpty()
    }
}
2.2.2 Initialize the Web3Auth instance in the Kotlin module and make it a singleton component.
val appModule = module {
    single {
        getWeb3AuthHelper(get())
    }

    // Additional code

    viewModel { MainViewModel(get()) }
}

private fun getWeb3AuthHelper(context: Context): Web3AuthHelper {
    val web3Auth = Web3Auth(
        Web3AuthOptions(
            clientId = "WEB3AUTH_CLIENT_ID",
            context = context,
            network = Network.SAPPHIRE_MAINNET,
            redirectUrl = Uri.parse("w3a://com.example.android_playground/auth")
        )
    )

    return Web3AuthHelperImpl(web3Auth)
}
Learn more about Embedded Wallets initialization.
2.3 Session management
To check whether the user is authenticated, you can use the getPrivateKey or getEd25519PrivKey method.
For an authenticated user, the result would be a non-empty string. You can navigate to different
views based on the result. If the user is already authenticated, we'll generate and prepare the Credentials,
required to interact with the blockchain. Along with that, we'll retrieve user info, and navigate them
to HomeScreen. In case of no active session, we'll navigate to LoginScreen to authenticate again.
::: note
Learn more about Web3Auth session management.
:::
Since we are using the MVVM architecture, we'll create a ViewModel class to encapsulate the business
logic for Embedded Wallets and Ethereum chain interaction.
class MainViewModel(private val web3AuthHelper: Web3AuthHelper) : ViewModel() {

    // _isLoggedIn can be used in the UI to know whether the user is logged.
    private val _isLoggedIn: MutableStateFlow<Boolean> = MutableStateFlow(false)
    val isLoggedIn: StateFlow<Boolean> = _isLoggedIn

    lateinit var credentials: Credentials
    lateinit var userInfo: UserInfo

    // Additional code

    // Function to retrieve private key.
    private fun privateKey(): String {
        return web3AuthHelper.getPrivateKey()
    }

    // prepareCredentials uses the private key to create Ethereum credentials which
    // can be used to retrieve the EOA address, and sign the transactions.
    private fun prepareCredentials() {
        credentials = Credentials.create(privateKey())
    }

    private fun prepareUserInfo() {
        userInfo = web3AuthHelper.getUserInfo()
    }

    // Additional code

    fun initialise() {
        viewModelScope.launch {
            web3AuthHelper.initialize().await()
            isUserLoggedIn()
        }
    }

    private fun isUserLoggedIn() {
        viewModelScope.launch {
            try {
                val isLoggedIn = web3AuthHelper.isUserAuthenticated()
                if (isLoggedIn) {
                    prepareCredentials()
                    prepareUserInfo()
                }
                _isLoggedIn.emit(isLoggedIn)
            } catch (e: Exception) {
                _isLoggedIn.emit(false)
            }
        }
    }
}
2.4 Authentication
If the user is not authenticated, we can utilize the login method to authenticate the user. For the
wallet, we will add an Email Passwordless login. We'll create a helper function, login inside
MainViewModel. The login method is pretty straightforward in Embedded Wallets and takes LoginParams as input.
After successfully logging in, we'll generate and prepare the Credentials, required to interact with the
blockchain. Along with that, we'll retrieve user info, and navigate them to HomeScreen.
Learn more about Embedded Wallets' LoginParams.
class MainViewModel(private val web3AuthHelper: Web3AuthHelper) : ViewModel() {
    // Additional code

    fun login(email: String) {
        val loginParams = LoginParams(
            loginProvider = Provider.EMAIL_PASSWORDLESS,
            extraLoginOptions = ExtraLoginOptions(login_hint = email)
        )
        viewModelScope.launch {
            try {
                web3AuthHelper.login(loginParams = loginParams).await()
                // Functions from Session Management code snippets
                prepareCredentials()
                prepareUserInfo()

                // Emit true to navigate to HomeScreen
                _isLoggedIn.emit(true)
            } catch (error: Exception) {
                _isLoggedIn.emit(false)
                throw error
            }
        }
    }
}
Step 3: Set up blockchain providers
Once we have successfully authenticated the user, the next step is to fetch the user details, retrieve the wallet address, and prepare blockchain providers for interactions. This guide supports the Ethereum ecosystem, but the general idea can be used for any blockchain ecosystem.
Given that the project follows MVVM architecture pattern, we'll want to create a use case to interact with the blockchain. This use case will help us expand the blockchain support while isolating it from the rest of the application.
For interacting with Ethereum chains, we'll use the web3j SDK.
To install the web3j SDK, in your module-level build.gradle or settings.gradle file, add web3j in your
app-level dependencies.
dependencies {
    // ...
    implementation 'org.web3j:core:4.8.7-android'
}
After successfully installing the SDK, it's time to set up our Ethereum use case. First, we'll create a new
class, EthereumUseCase interface, which will used as a base class for EthereumUseCaseImpl. If you wish
to support any additional ecosystem, you can create the chain-agnostic use case and implement the methods.
Learn more about integrating different blockchains with Embedded Wallets.
interface EthereumUseCase {
    suspend fun getBalance(publicKey: String): String
    suspend fun signMessage(message: String, sender: Credentials): String
    suspend fun sendETH(amount: String, recipientAddress: String, sender: Credentials): String

    suspend fun getBalanceOf(contractAddress: String, address: String, credentials: Credentials): String
    suspend fun approve(contractAddress: String, spenderAddress: String, credentials: Credentials): String
}
Generally, for any blockchain provider, you'll only require the getBalance, sendTransaction, and
signMessage. The getBalance and approve can be used to interact with smart contracts. To interact
with smart contracts, we'll be required to generate smart contract function wrappers in Java from Solidity
ABI files.
3.1 Smart contract wrappers��
For generating the wrappers, we'll use the web3j command line tools.
3.1.1 To install the web3j CLI, you can use the following command:
curl -L get.web3j.io | sh && source ~/.web3j/source.sh
Learn more about web3j CLI installation.
3.1.2 Create a Token.sol file, which has the smart contract interface for the ERC-20 token.
Learn more about the ERC-20 token standard.
// SPDX-License-Identifier: MIT
pragma solidity ^0.8.0;

interface IERC20 {
    function totalSupply() external view returns (uint256);
    function balanceOf(address account) external view returns (uint256);
    function transfer(address recipient, uint256 amount)
        external
        returns (bool);
    function allowance(address owner, address spender)
        external
        view
        returns (uint256);
    function approve(address spender, uint256 amount) external returns (bool);
    function transferFrom(address sender, address recipient, uint256 amount)
        external
        returns (bool);
}
3.1.3 Install solc which will allow us to compile the solidity file and generate the ABI and bin files to generate the wrappers.
For this, we'll require the npm or yarn. If you have the npm already installed, you can use the following command to install the solc package globally.
npm install -g solc
3.1.4 Compile the smart contract. The bin and ABI options will generate the ABI and bin files. Feel free to choose the output directory of your choice.
solc Token.sol --bin --abi --optimize -o <output-dir>/
3.1.5 Use the web3j CLI to generate the wrappers.
web3j generate solidity -b /path/to/Tokne.bin -a /path/to/Token..abi -o /path/to/src/main/java -p com.your.organisation.name
Once you run the command, it'll create a wrapper Token.java which extends the Contract. You can use this
class to interact with the smart contracts. Please ensure to compile and regenerate wrappers if you make
any changes in the smart contract.
3.2 Ethereum use case implementation
Next, we'll create EthereumUseCaseImpl and implement the methods. To create the Web3j instance, you'll
require the RPC target URL. If you are using public RPCs, you can face
some network congestion. It's ideal to use paid RPCs for production.
The getBalance, and approve methods are used to interact with smart contracts in the Ethereum ecosystem.
The getBalance is used to read the balance from the ERC-20 smart contracts, whereas the approve is used to
change the approval to zero for the ERC-20. For the getBalance and approve we'll be using the Token
wrapper.
class EthereumUseCaseImpl(
    private val web3: Web3j
) : EthereumUseCase {
    override suspend fun getBalance(publicKey: String): String = withContext(Dispatchers.IO) {
        try {
            val balanceResponse = web3.ethGetBalance(publicKey, DefaultBlockParameterName.LATEST).send()
            val ethBalance = BigDecimal.valueOf(balanceResponse.balance.toDouble()).divide(BigDecimal.TEN.pow(18))
            DecimalFormat("#,##0.00000").format(ethBalance)
        } catch (e: Exception) {
            throw e
        }
    }

    override suspend fun signMessage(message: String, sender: Credentials): String {
        try {
            val signature = Sign.signPrefixedMessage(message.toByteArray(), sender.ecKeyPair)
            val r = Numeric.toHexString(signature.r)
            val s = Numeric.toHexString(signature.s).substring(2)
            val v = Numeric.toHexString(signature.v).substring(2)

            return StringBuilder(r).append(s).append(v).toString()
        } catch (e: Exception) {
            throw e
        }
    }

    override suspend fun sendETH(amount: String, recipientAddress: String, sender: Credentials): String {
        try {


            val ethGetTransactionCount: EthGetTransactionCount =
                web3.ethGetTransactionCount(sender.address, DefaultBlockParameterName.LATEST)
                    .sendAsync().get()
            val nonce: BigInteger = ethGetTransactionCount.transactionCount
            val value: BigInteger = Convert.toWei(amount, Convert.Unit.ETHER).toBigInteger()
            val gasLimit: BigInteger = BigInteger.valueOf(21000)
            val gasPrice = web3.ethGasPrice().sendAsync().get()


            val rawTransaction: RawTransaction = RawTransaction.createEtherTransaction(
                nonce,
                gasPrice.gasPrice,
                gasLimit,
                recipientAddress,
                value
            )

            val signedMessage: ByteArray = TransactionEncoder.signMessage(rawTransaction, sender)
            val hexValue: String = Numeric.toHexString(signedMessage)
            val ethSendTransaction: EthSendTransaction =
                web3.ethSendRawTransaction(hexValue).sendAsync().get()

            if (ethSendTransaction.error != null) {
                throw Exception(ethSendTransaction.error.message)
            } else {
                return ethSendTransaction.transactionHash
            }
        } catch (e: Exception) {
            throw e
        }
    }

    override suspend fun getBalanceOf(contractAddress: String, address: String, credentials: Credentials): String = withContext(Dispatchers.IO) {
        val token = Token.load(contractAddress, web3, credentials, DefaultGasProvider())
        val balanceResponse = token.balanceOf(address).sendAsync().get()
        BigDecimal.valueOf(balanceResponse.toDouble()).divide(BigDecimal.TEN.pow(18)).toString()
    }

    override suspend fun approve(
        contractAddress: String,
        spenderAddress: String,
        credentials: Credentials
    ): String = withContext(Dispatchers.IO) {
        val token = Token.load(contractAddress, web3, credentials, DefaultGasProvider())
        val hash = token.approve(spenderAddress, BigInteger.ZERO).sendAsync().get()
        hash.transactionHash
    }
}
Once we have the created EthereumUseCaseImpl, next is to initialize the EthereumUseCaseImpl instance in the Kotlin
module.
val appModule = module {
    // Additional code

    factory<EthereumUseCase> { EthereumUseCaseImpl(Web3j.build(HttpService(chainConfigList.first().rpcTarget))) }

    // Additional code
}
Step 4: Set up supported chains
Next, we must define the supported chains. To keep things simple, we'll create a new file ChainConfigList with an
array of ChainConfig to define the supported chains.
Below, we support Ethereum Sepolia, and Arbitrum Sepolia. If you wish to support more chains in your wallet, add the config with the required details in the list below. Along with that, you can also add the desired chain using the add custom chain feature in the app.
Android cannot fetch chain configuration from the Embedded Wallets dashboard; supported chains must be defined in code as shown below. Learn more about supporting chains and chain-specific integrations.
var chainConfigList = arrayOf(
    ChainConfig(
        chainNamespace = ChainNamespace.EIP155,
        decimals = 18,
        blockExplorerUrl = "https://sepolia.etherscan.io/",
        chainId = "11155111",
        displayName = "Ethereum Sepolia",
        rpcTarget = "https://1rpc.io/sepolia",
        ticker = "ETH",
        tickerName = "Ethereum"
    ),
    ChainConfig(
        chainNamespace = ChainNamespace.EIP155,
        decimals = 18,
        blockExplorerUrl = "https://sepolia.etherscan.io/",
        chainId = "421614",
        displayName = "Arbitrum Sepolia",
        rpcTarget = "https://endpoints.omniatech.io/v1/arbitrum/sepolia/public",
        ticker = "ETH",
        tickerName = "Ethereum"
    )
)
Step 5: Wallet implementation
Next, we need to integrate and plug the EthereumUseCase and supported chains into the wallet. Since we have
already created MainViewModel before, we'll add the other features inside it.
This will help us to separate business logic from UI.
5.1 Set up MainViewModel
We will add more functionality in MainViewModel to help us manage the state and functionality of the wallet.
It will help us manage the state of the currently selected chain, fetch balance, sign transactions, and access
other functionalities of Web3Auth.
class MainViewModel(private val web3AuthHelper: Web3AuthHelper) : ViewModel() {
    // _isLoggedIn can be used in the UI to know whether the user is logged.
    private val _isLoggedIn: MutableStateFlow<Boolean> = MutableStateFlow(false)
    val isLoggedIn: StateFlow<Boolean> = _isLoggedIn

    // _isAccountLoaded can be used in the UI to know whether the user's account is loaded.
    // If it's false, we'll show the loading indictor.
    private val _isAccountLoaded: MutableStateFlow<Boolean> = MutableStateFlow(false)
    val isAccountLoaded: StateFlow<Boolean> = _isAccountLoaded

    // _balance holds the user's balance for the selected ChainConfig.
    private val _balance: MutableStateFlow<String> = MutableStateFlow("0.0")
    val balance: StateFlow<String> = _balance


    // Currently selected ChainConfig by the user. By default, it would be the first ChainConfig
    // in the list.
    private val _selectedChain: MutableStateFlow<ChainConfig> = MutableStateFlow(chainConfigList[0])
    val selectedChain: StateFlow<ChainConfig> = _selectedChain

    // Credentials will be used to retrive user's EOA address, and sign the transactions.
    lateinit var credentials: Credentials
    lateinit var userInfo: UserInfo

    // EthereumUseCaseImpl to interact with the selected Ethereum ChainConfig.
    private var ethereumUseCase: EthereumUseCase = EthereumUseCaseImpl(
        Web3j.build(
            HttpService(
                chainConfigList.first().rpcTarget
            )
        )
    )

    // User's Ethereum compatible private key.
    private fun privateKey(): String {
        return web3AuthHelper.getPrivateKey()
    }

    private fun prepareCredentials() {
        credentials = Credentials.create(privateKey())
    }

    private fun prepareUserInfo() {
        userInfo = web3AuthHelper.getUserInfo()
    }

    fun login(email: String) {
       // Defined previously
    }

    fun initialise() {
        // Defined previously
    }

    private fun isUserLoggedIn() {
        // Defined previously
    }

    // Retrieves user's balance for the currently selected ChainConfig.
    fun getBalance() {
        viewModelScope.launch {
            _isAccountLoaded.emit(false)
            try {
                Log.d("Address", credentials.address)
                _balance.emit(ethereumUseCase.getBalance(credentials.address))
                _isAccountLoaded.emit(true)
            } catch (e: Exception) {
                _isAccountLoaded.emit(false)
                throw e
            }
        }
    }

    // Logouts out user, and deletes the currently active session.
    fun logOut() {
        viewModelScope.launch {
            try {
                web3AuthHelper.logOut().await()
                _isLoggedIn.emit(true)
            } catch (e: Exception) {
                _isLoggedIn.emit(false)
            }
        }
    }

    // Signs and broadcast a trasnfer transaction.
    fun sendTransaction(value: String, recipient: String, onSign: (hash: String?, error: String?) -> Unit) {
        viewModelScope.launch {
            try {
              val hash = ethereumUseCase.sendETH(value, recipient, credentials)
                onSign(hash, null)
            } catch (e: Exception) {
                e.localizedMessage?.let { onSign(null, it) }
            }
        }
    }

    // Signs a personal message.
    fun signMessage(message: String, onSign: (hash: String?, error: String?) -> Unit) {
        viewModelScope.launch {
            try {
              val signature = ethereumUseCase.signMessage(message, credentials)
                Log.d("Signature", signature)
                onSign(signature, null)
            } catch (e: Exception) {
                e.localizedMessage?.let { onSign(null, it) }
            }
        }
    }

    // Changes the currently selected ChainConfig.
    fun changeChainConfig(config: ChainConfig) {
        _selectedChain.value = config
        ethereumUseCase = EthereumUseCaseImpl(
            Web3j.build(
                HttpService(
                    config.rpcTarget
                )
            )
        )
        getBalance()
    }

    // Retreives the ERC-20 token balance using the getBalanceOf method.
    fun getTokenBalance(contractAddress: String, onSuccess: (balance: String?, error: String?) -> Unit) {
        viewModelScope.launch {
            try {
                val balance = ethereumUseCase.getBalanceOf(contractAddress, credentials.address, credentials)
                Log.d("Token Balance:",balance)
                onSuccess(balance, null)
            } catch (e: Exception) {
                onSuccess(null, e.localizedMessage)
            }
        }
    }

    // Revokes the approval for the ERC-20 token using the approve function.
    fun revokeApproval(contractAddress: String, spenderAddress: String, onRevoke: (hash: String?, error: String?) -> Unit) {
        viewModelScope.launch {
            try {
                val hash = ethereumUseCase.approve(contractAddress, spenderAddress, credentials)
                Log.d("Revoke Hash:", hash)
                onRevoke(hash, null)
            } catch (e: Exception) {
                onRevoke(null, e.localizedMessage)
            }
        }
    }

    fun userInfo(onAvailable: (userInfo: UserInfo?, error: String?) -> Unit) {
        try {
            val info = web3AuthHelper.getUserInfo()
            onAvailable(info, null)
        } catch (e: Exception) {
            e.localizedMessage?.let { onAvailable(null, it) }
        }
    }
}
5.2 Set up home screen
Next, we create a new HomeScreen to show user details as email address,
wallet address, user's balance for the selected chain, and blockchain interaction methods.
To get the user's balance, we'll use getBalance method from the MainViewModel. The method internally
uses EthereumUseCaseImpl to retrieve the user's wallet address and fetch the wallet balance for the address.
Check out EthereumUseCaseImpl implementation for more details.
For the bottom navigation, we have created TabBarView, please check TabBarView.kt file for more details on
UI implementation.
@OptIn(ExperimentalMaterial3Api::class)
@Composable
fun HomeScreen(viewModel: MainViewModel) {
    val homeTab = TabBarItem(
        title = "Home",
        selectedIcon = Icons.Filled.Home,
        unselectedIcon = Icons.Outlined.Home
    )
    val alertsTab = TabBarItem(
        title = "Sign & Send",
        selectedIcon = Icons.Filled.Create,
        unselectedIcon = Icons.Outlined.Create
    )
    val settingsTab = TabBarItem(
        title = "Smart Contracts",
        selectedIcon = Icons.Filled.Receipt,
        unselectedIcon = Icons.Outlined.Receipt
    )

    val tabBarItems = listOf(homeTab, alertsTab, settingsTab)

    val navController = rememberNavController()

    // Show the UI if the account is loaded, otherwise show the
    // progress indictor.
    if (viewModel.isAccountLoaded.collectAsState().value) {
        Scaffold(
            topBar = {
                TopAppBar(
                    title = {
                        Text(text = "Android Playground")
                    },

                    actions = {
                        Row {
                            // Logs out user
                            IconButton(onClick = { viewModel.logOut() }) {
                                Icon(Icons.Outlined.ExitToApp, contentDescription = "Logout")
                            }
                        }
                    }
                )
            },
            bottomBar = {
                TabView(tabBarItems = tabBarItems, navController = navController)
            }
        ) { innerPadding ->
            // Different Views which will be shown upon user selection. By default, it'll be AccountView.
            NavHost(navController = navController, startDestination = "Home", modifier = Modifier.padding(innerPadding)) {
                composable(homeTab.title) {
                    AccountView(viewModel = viewModel)
                }
                composable(alertsTab.title) {
                    TransactionScreen(viewModel = viewModel)
                }
                composable(settingsTab.title) {
                   SmartContractsScreen(viewModel = viewModel)
                }
            }
        }
    } else {
        // Shows CircularProgressIndicator
        Box(modifier = Modifier
            .fillMaxWidth()
            .fillMaxHeight(), contentAlignment = Alignment.Center) {
            CircularProgressIndicator()
        }
    }
}

@OptIn(ExperimentalMaterial3Api::class, ExperimentalMaterialApi::class)
@Composable
fun AccountView(viewModel: MainViewModel) {
    // Used for ExposedDropdownMenuBox state management
    var expanded by remember { mutableStateOf(false) }

    // Defines whether to showcase user info dialog. By default,
    // it's false.
    val openUserInfoDialog = remember {
        mutableStateOf(false)
    }

    var balance = viewModel.balance.collectAsState().value
    val clipboardManager: ClipboardManager = LocalClipboardManager.current
    val refreshing by viewModel.isAccountLoaded.collectAsState()

    val pullRefreshState = rememberPullRefreshState(!refreshing, { viewModel.getBalance() })

    // Displays UserInfoDialog when openUserInfoDialog is true.
    if(openUserInfoDialog.value) {
        UserInfoDialog(onDismissRequest = {
            openUserInfoDialog.value = false
        }, userInfo = viewModel.userInfo.toString())
    }

    Box(Modifier.pullRefresh(pullRefreshState)) {
        LazyColumn(
            modifier = Modifier
                .padding(PaddingValues(horizontal = 16.dp, vertical = 8.dp))
        ) {
            item {
                // Additional UI
                Box(
                    modifier = Modifier
                        .fillMaxWidth()
                ) {
                    // Dropdown for chain selection
                    ExposedDropdownMenuBox(
                        expanded = expanded,
                        onExpandedChange = {
                            expanded = !expanded
                        }
                    ) {
                        OutlinedTextField(
                            value = viewModel.selectedChain.collectAsState().value.displayName!!,
                            onValueChange = {},
                            readOnly = true,
                            trailingIcon = { ExposedDropdownMenuDefaults.TrailingIcon(expanded = expanded) },
                            modifier = Modifier
                                .menuAnchor()
                                .fillMaxWidth()
                        )

                        ExposedDropdownMenu(
                            expanded = expanded,
                            onDismissRequest = { expanded = false }
                        ) {
                            chainConfigList.forEach { item ->
                                DropdownMenuItem(
                                    text = { Text(text = item.displayName!!) },
                                    onClick = {
                                        expanded = false
                                        viewModel.changeChainConfig(item)
                                    }
                                )
                            }
                        }
                    }
                }
                // Additonal UI code

                // Display User info
                Row {
                    Box(
                        modifier = Modifier
                            .height(120.dp)
                            .width(120.dp)
                            .background(color = MaterialTheme.colorScheme.primary),
                        contentAlignment = Alignment.Center
                    ) {
                        Text(
                            text = viewModel.userInfo.name.first().uppercase(),
                            style = Typography.headlineLarge.copy(color = Color.White)
                        )
                    }

                    Box(modifier = Modifier.width(16.dp))
                    Column {
                        Text(text = viewModel.userInfo.name, style = Typography.titleLarge)
                        Box(modifier = Modifier.height(12.dp))
                        Row(
                            horizontalArrangement = Arrangement.SpaceBetween,
                            verticalAlignment = Alignment.CenterVertically
                        ) {
                            // Displays user's EOA address
                            Text(
                                text = viewModel.credentials.address.addressAbbreviation(),
                                style = Typography.titleMedium
                            )
                            IconButton(onClick = {
                                clipboardManager.setText(AnnotatedString(viewModel.credentials.address))
                            }) {
                                Icon(Icons.Outlined.ContentCopy, contentDescription = "Copy")
                            }
                        }
                    }
                }
                // Additional UI code
                Row(
                    modifier = Modifier.fillMaxWidth(),
                    horizontalArrangement = Arrangement.SpaceBetween
                ) {
                    Column {
                        // Displays user's wallet balance for selected ChainConfig.
                        Text(text = "Wallet Balance", style = Typography.titleMedium)
                        Spacer(modifier = Modifier.height(8.dp))
                        Text(text = balance, style = Typography.headlineSmall)
                    }
                    Column(horizontalAlignment = Alignment.End) {
                        // Displays the chainId for selected ChainConfig
                        Text(text = "Chain id", style = Typography.titleMedium)
                        Spacer(modifier = Modifier.height(8.dp))
                        Text(text = viewModel.selectedChain.collectAsState().value.chainId, style = Typography.headlineSmall)
                    }
                }
            }
        }

        // Adds additional pull to refresh functionality
        PullRefreshIndicator(!refreshing, pullRefreshState, Modifier.align(Alignment.TopCenter))
    }
}
5.3 Chain interactions
We need to set up chain interactions for signing messages, signing transactions, reading from contracts, and writing on contracts.
5.3.1 For signing messages and transaction, we'll create a new TransactionScreen widget and utilize signMessage and
sendTransaction from MainViewModel for the respective functionality.
@OptIn(ExperimentalPagerApi::class)
@Composable
fun TransactionScreen(viewModel: MainViewModel) {
    val pagerState = rememberPagerState( 0)
    val tabItems = listOf(
        "Sign Message",
        "Send Transaction",
    )

    Column(horizontalAlignment = Alignment.CenterHorizontally) {
        Spacer(modifier = Modifier.height(16.dp))
        Text(
            text = "Signing/Transaction", style = Typography.headlineLarge,
            textAlign = TextAlign.Center
        )
        Spacer(modifier = Modifier.height(16.dp))
        Tabs(pagerState = pagerState, tabItems)
        Spacer(modifier = Modifier.height(16.dp))
        TabsContent(pagerState = pagerState, viewModel)
    }
}

@OptIn(ExperimentalPagerApi::class)
@Composable
fun TabsContent(pagerState: PagerState, viewModel: MainViewModel) {

    HorizontalPager(state = pagerState, count =  2) {
        page ->
        when (page) {
            0 -> SigningView(viewModel = viewModel)
            1 -> TransactionView(viewModel = viewModel)
        }
    }
}

@Composable
fun SigningView(viewModel: MainViewModel) {
    // Default signing message
    var messageText by remember { mutableStateOf("Welcome to Web3Auth") }
    val openAlertDialog = remember { mutableStateOf(false) }
    var dialogText by remember { mutableStateOf("") }

    when {
        openAlertDialog.value -> MinimalDialog(dialogText) {
            openAlertDialog.value = false
        }
    }

    Column(modifier = Modifier
        .fillMaxSize()
        .padding(horizontal = 16.dp)) {
        // Additional UI code
        Button(onClick = {
            // Signs the message and show the signature
            viewModel.signMessage(messageText, onSign = {
                signature, error ->
                if(signature != null) {
                   dialogText = "Signature:\n$signature"
                    openAlertDialog.value = true
                } else {
                    dialogText = "Error:\n$error"
                    openAlertDialog.value = true

                }
            })
        }, shape = RoundedCornerShape(4.dp), modifier = Modifier.fillMaxWidth()) {
            Text("Sign Message")
        }

    }
}


@Composable
fun TransactionView(viewModel: MainViewModel) {
    var valueText by remember { mutableStateOf("") }
    var addressText by remember { mutableStateOf("") }
    val openAlertDialog = remember { mutableStateOf(false) }
    var dialogText by remember { mutableStateOf("") }

    when {
        openAlertDialog.value -> MinimalDialog(dialogText) {
            openAlertDialog.value = false
        }
    }

    Column(modifier = Modifier
        .fillMaxSize()
        .padding(horizontal = 16.dp)) {
        // Additional UI code
        Button(onClick = {
            // Performs transfer transaction and displays the hash for the transaction
            viewModel.sendTransaction(valueText, addressText, onSign = {
                    hash, error ->
                if(hash != null) {
                    dialogText = "Hash:\n$hash"
                    openAlertDialog.value = true
                } else {
                    dialogText = "Error:\n$error"
                    openAlertDialog.value = true
                }
            })
        }, shape = RoundedCornerShape(4.dp), modifier = Modifier.fillMaxWidth()) {
            Text("Send transaction")
        }
    }
}
5.3.2 Next, we create a SmartContractsScreen for fetching ERC-20 token balances, and revoking approval.
We'll utilize the getTokenBalance and revokeApproval methods from MainViewModel for this.
@OptIn(ExperimentalPagerApi::class)
@Composable
fun SmartContractsScreen(viewModel: MainViewModel) {
    val pagerState = rememberPagerState( 0)
    val tabItems = listOf(
        "Read from Contract",
        "Write from Contract",
    )

    Column(horizontalAlignment = Alignment.CenterHorizontally) {
        Spacer(modifier = Modifier.height(16.dp))
        Text(
            text = "Smart Contract Interactions", style = Typography.headlineLarge,
            textAlign = TextAlign.Center
        )
        Spacer(modifier = Modifier.height(16.dp))
        Tabs(pagerState = pagerState, tabItems)
        Spacer(modifier = Modifier.height(16.dp))
        ContractTabsContent(pagerState = pagerState, viewModel)
    }
}


@Composable
@OptIn(ExperimentalPagerApi::class)
fun ContractTabsContent(pagerState: PagerState, viewModel: MainViewModel) {
    HorizontalPager(state = pagerState, count =  2) {
            page ->
        when (page) {
            0 -> ReadContractView(viewModel = viewModel)
            1 -> WriteContractView(viewModel = viewModel)
        }
    }
}

@Composable
fun ReadContractView(viewModel: MainViewModel) {
    var contractAddressText by remember { mutableStateOf("0x10279e6333f9d0EE103F4715b8aaEA75BE61464C") }
    val openAlertDialog = remember { mutableStateOf(false) }
    var dialogText by remember { mutableStateOf("") }

    when {
        openAlertDialog.value -> MinimalDialog(dialogText) {
            openAlertDialog.value = false
        }
    }

    Column(modifier = Modifier
        .fillMaxSize()
        .padding(horizontal = 16.dp)) {
        // Additional code
        Button(onClick = {
            // Retrieves ERC-20 token balance for the user's EOA address
            viewModel.getTokenBalance(contractAddressText, onSuccess = {
                balance, error ->
                if(balance != null) {
                    dialogText = "Balance:\n$balance"
                    openAlertDialog.value = true
                } else {
                    dialogText = "Error:\n$error"
                    openAlertDialog.value = true
                }
            })
        }, shape = RoundedCornerShape(4.dp), modifier = Modifier.fillMaxWidth()) {
            Text("Fetch Balance")
        }
    }
}

@Composable
fun WriteContractView(viewModel: MainViewModel) {
    var contractAddressText by remember { mutableStateOf("0x10279e6333f9d0EE103F4715b8aaEA75BE61464C") }
    var spenderAddressText by remember { mutableStateOf("") }
    val openAlertDialog = remember { mutableStateOf(false) }
    var dialogText by remember { mutableStateOf("") }

    when {
        openAlertDialog.value -> MinimalDialog(dialogText) {
            openAlertDialog.value = false
        }
    }

    Column(modifier = Modifier
        .fillMaxSize()
        .padding(horizontal = 16.dp)) {
        // Additional code
        Button(onClick = {
            // Revokes the approval of ERC-20 token for respective spenderAddress.
            viewModel.revokeApproval(contractAddressText, spenderAddressText, onRevoke = {
                hash, error ->
                if(hash != null) {
                    dialogText = "Hash:\n$hash"
                    openAlertDialog.value = true
                } else {
                    dialogText = "Error:\n$error"
                    openAlertDialog.value = true
                }
            })
        }, shape = RoundedCornerShape(4.dp), modifier = Modifier.fillMaxWidth()) {
            Text("Revoke Approval")
        }

    }
}
Congratulations, you have built an Ethereum web3 wallet. While this guide only provides an overview of how to create your wallet with Ethereum ecosystem support, the general idea can be used for any blockchain ecosystem.
Troubleshooting
ERC-20 transfers fail
Some widely used tokens (such as USDT) don't follow ERC-20 return values. If your wrapper or client expects
transfer/transferFrom to return a bool, calls can fail with ABI decoding errors.
How to fix:
- Generate your wrapper from the token's actual ABI, not a generic
IERC20interface. - Use a safe wrapper
(for example, OpenZeppelin's
SafeERC20) to handle empty return data.
Next steps
- Learn more about Embedded Wallets for Android.
- You can find the code used for the guide on our examples repo.